Create a new event here in the admin — Events › Events, then "New Event".
The same form is used to create an event and to edit one later, so nothing here is a one-time decision. When you're done, click "Create Event" at the bottom.
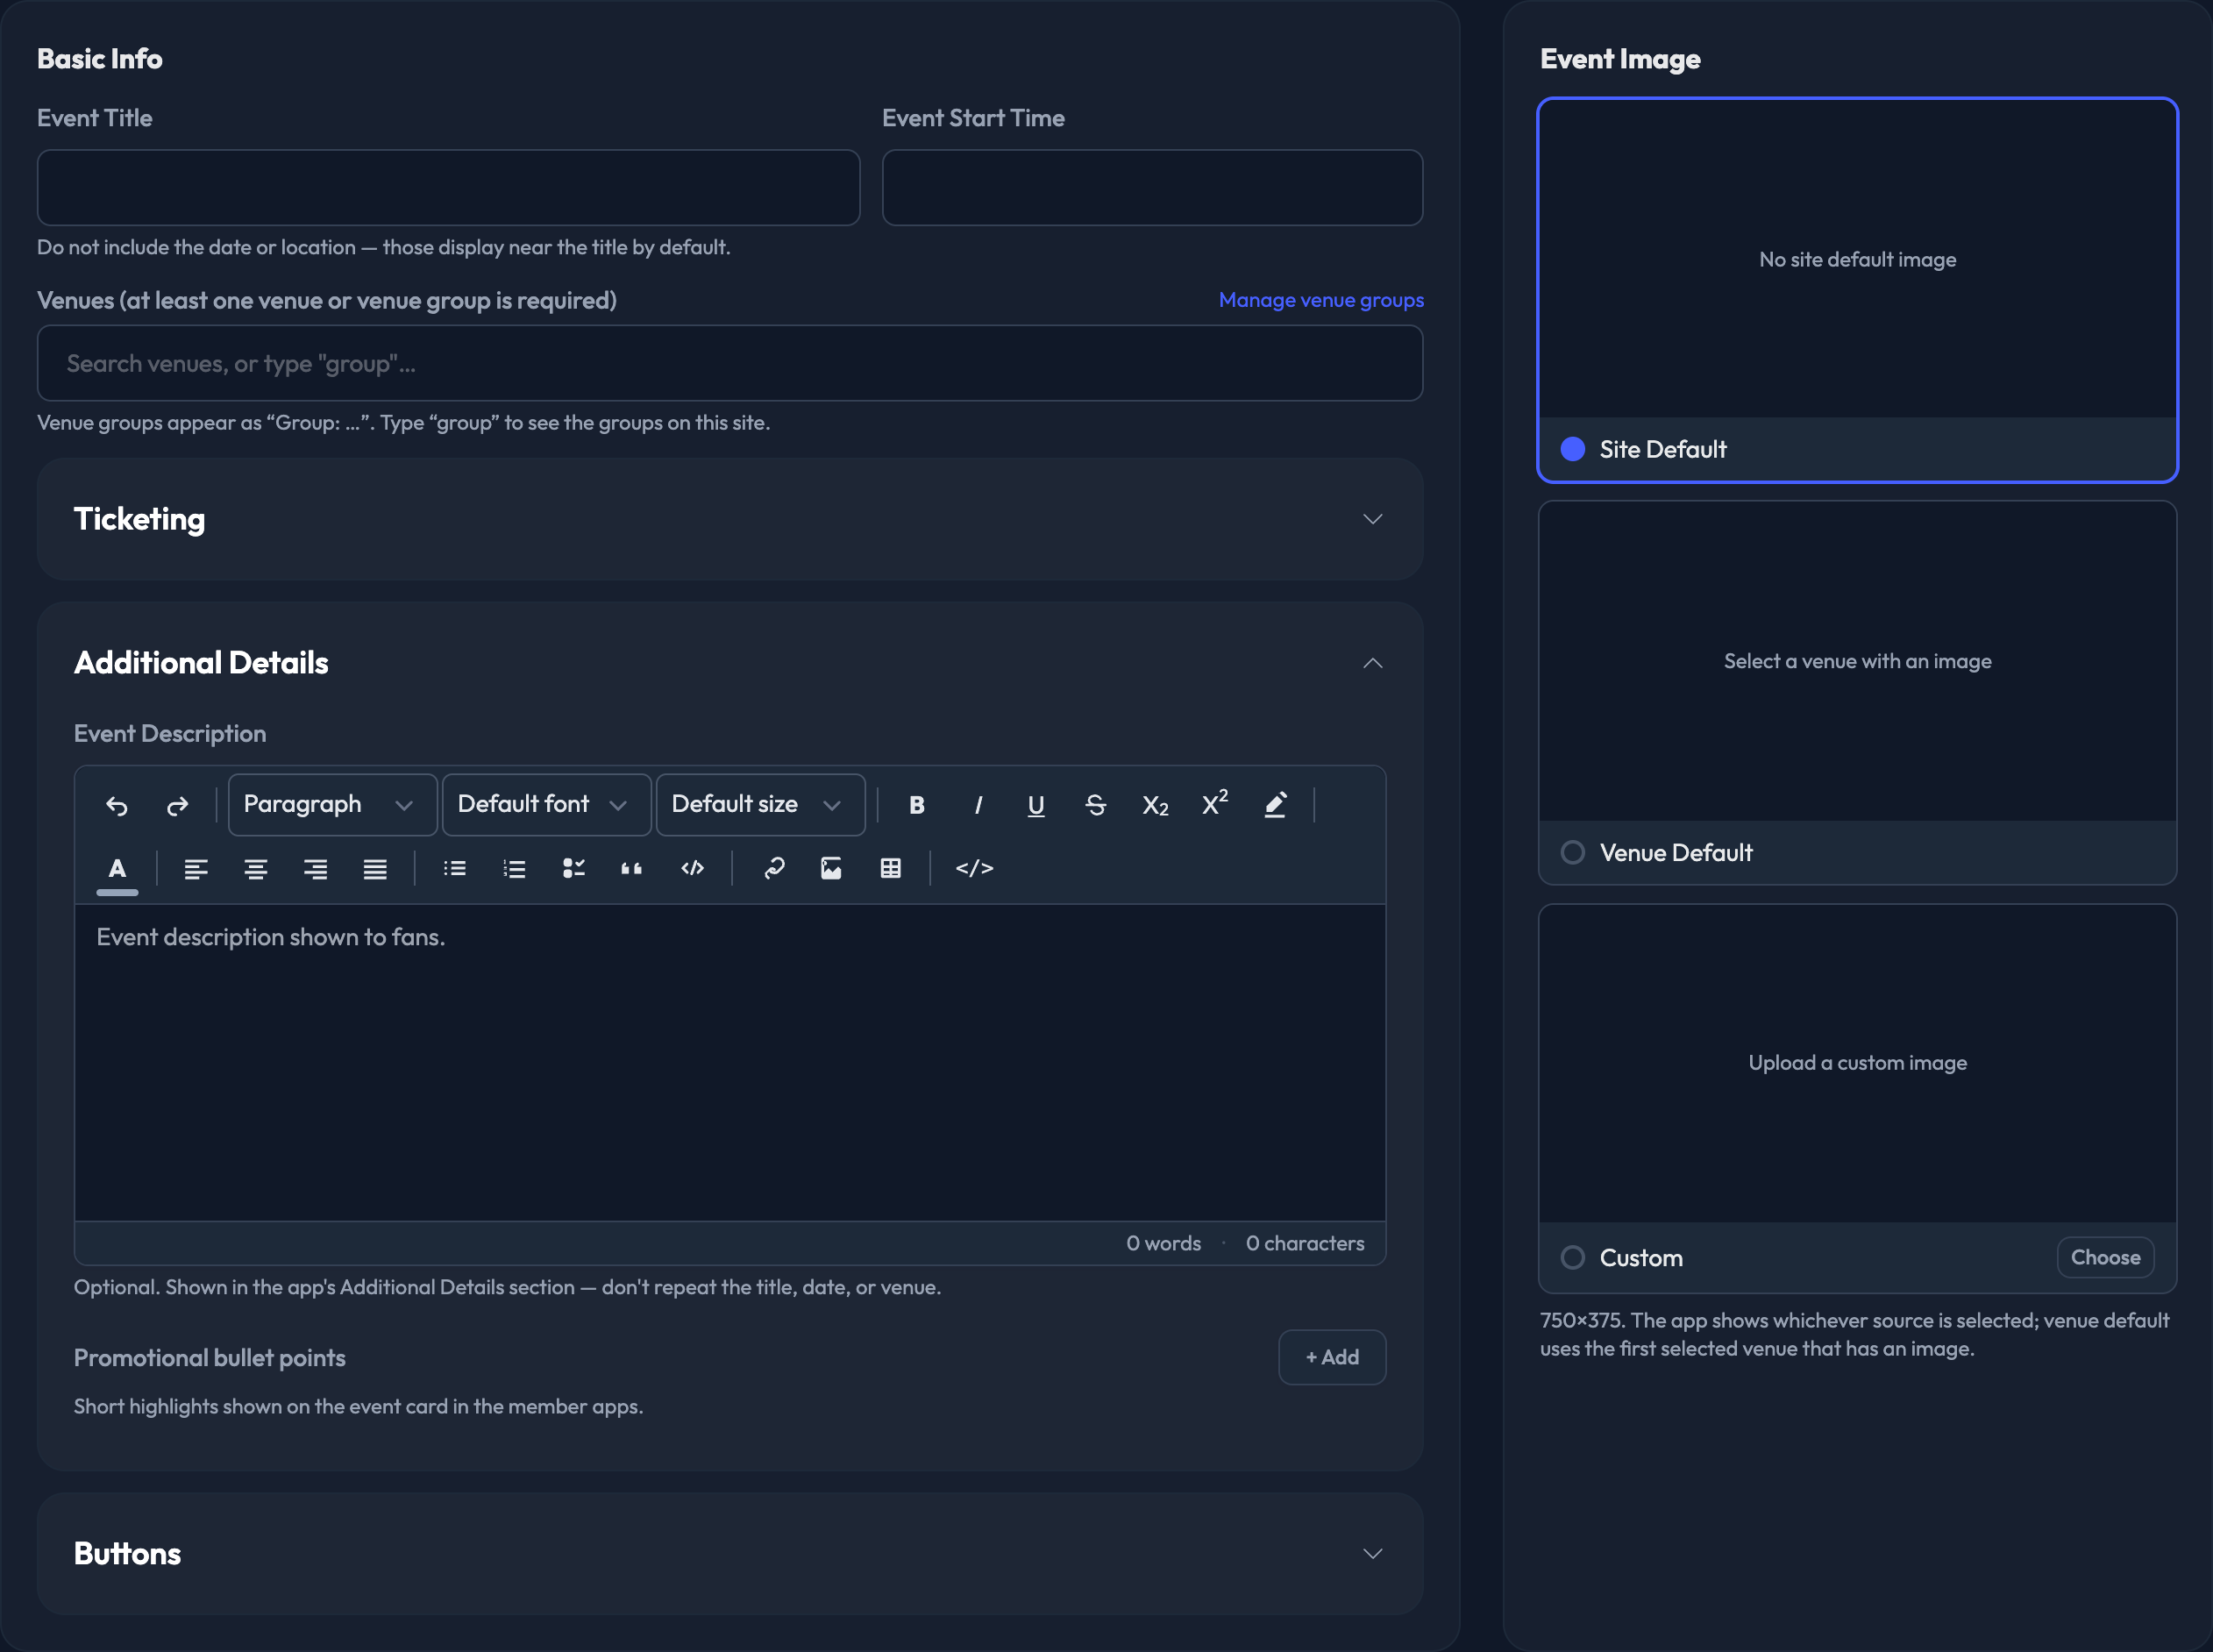

1. Enter the Event Title. Leave out the date and the location — those already display next to the title for members.
2. Enter the Event Start Time.

3. Add the Venues for the event. At least one venue or venue group is required — this is what check-in is measured against. Type to search; venue groups appear in the list as "Group: …", so typing "group" shows the groups on your site.
4. Custom Location Name appears once you've selected more than one venue. It's what members see as the place to attend — for example "Any ticket sales office". (Optional until multiple venues are set)
Open the Ticketing section to connect the event to your ticketing provider so scans score against it.
Ticket Purchase URL (Optional) — an https:// link members can use to buy tickets.
The provider fields you see depend on which integrations your program has. Each one links this event to the matching event on the provider's side:
TDC Events — add one or more TDC Event ID values.
Ticketmaster Events — pick the Archtics events from the dropdown.
Paciolan Events — add a Season Code and Event Code pair.
TicketReturn Events — add a TicketReturn Event ID.
SeatGeek Events and Ticketing Events — pick from the events already synced to your site.
Event Description (Optional) — shown in the app's Additional Details section. Don't repeat the title, date, or venue.
Promotional bullet points (Optional) — short highlights shown on the event card in the member apps. Each one takes an Icon and a line of Text. This is a good spot for special promotions happening during the event.
TV Station and Radio Station — where members can watch or listen.
Streams — add a stream and set its Type, whether it Opens in External / Webview / Integrated, the URL, the Button text, and an optional Width and Height.
Pick one of three sources on the right of Basic Info:
Site Default — your program's default event image.
Venue Default — the photo on the first selected venue that has one.
Custom — upload an image for this event only.
Images display at 750×375.
Welcome Push Notification (Optional) — sent to members when they check in, up to 140 characters. Use {{points_awarded}} and it's replaced with the points they earned.
Scheduled Push Notifications (Optional) — add a Message and how long After event start it should go out. These are sent to everyone in attendance.
Custom Display Text (Optional) — Custom Late Bonus Text replaces the default stay-late text on the event's page in the app, and Short Custom Late Bonus Text replaces it in the minified event view. Both are capped at 40 characters.
Check the "Check-in enabled" box in this section's header to reward attending this event.
1. Attendance Points — every member in attendance earns these.
2. Attendance Window — set in hours and minutes:
Check-in opens (before start) — how long before the start time attendance recording begins.
Check-in closes (after start) — how long after the start time it ends.
3. Early Arrival Bonus (Optional) — set Arrive before event start by (hours and minutes), then the points To Earn.
4. Stay Late Bonus (Optional) — choose a Stay Late Bonus Type:
Fixed Points — set Stay at event after start for and the points To Earn.
Points Per Minute — set Points Awarded per Minute. Members earn that many points for each minute between their first and last check-in, and the fixed bonus is not awarded while this is set.
Open Advanced inside Attendance & Points to set Per-Method Check-in Points. These are additive to attendance points — use them to incentivize a particular check-in method.
Beacon — points, plus Disable beacon check-ins.
GPS — points, plus Disable options for Check-ins and Check-outs.
API — points.
Ticket Scan — points. Shown on ticketing-enabled programs.
If watch is available on your program, check "Watch enabled" in this section's header.
1. Initial Watch Points — what a member receives for tapping "I'm Watching".
2. Watch Window — Watch opens (before start) is when the Happening Now card appears and exclusive stories unlock; Watch closes (after start) is when both disappear.
3. Continue-watching intervals (Optional) — add a row for each extra reward. Set how long After event start it appears, the Points, and how long it's Shown for.
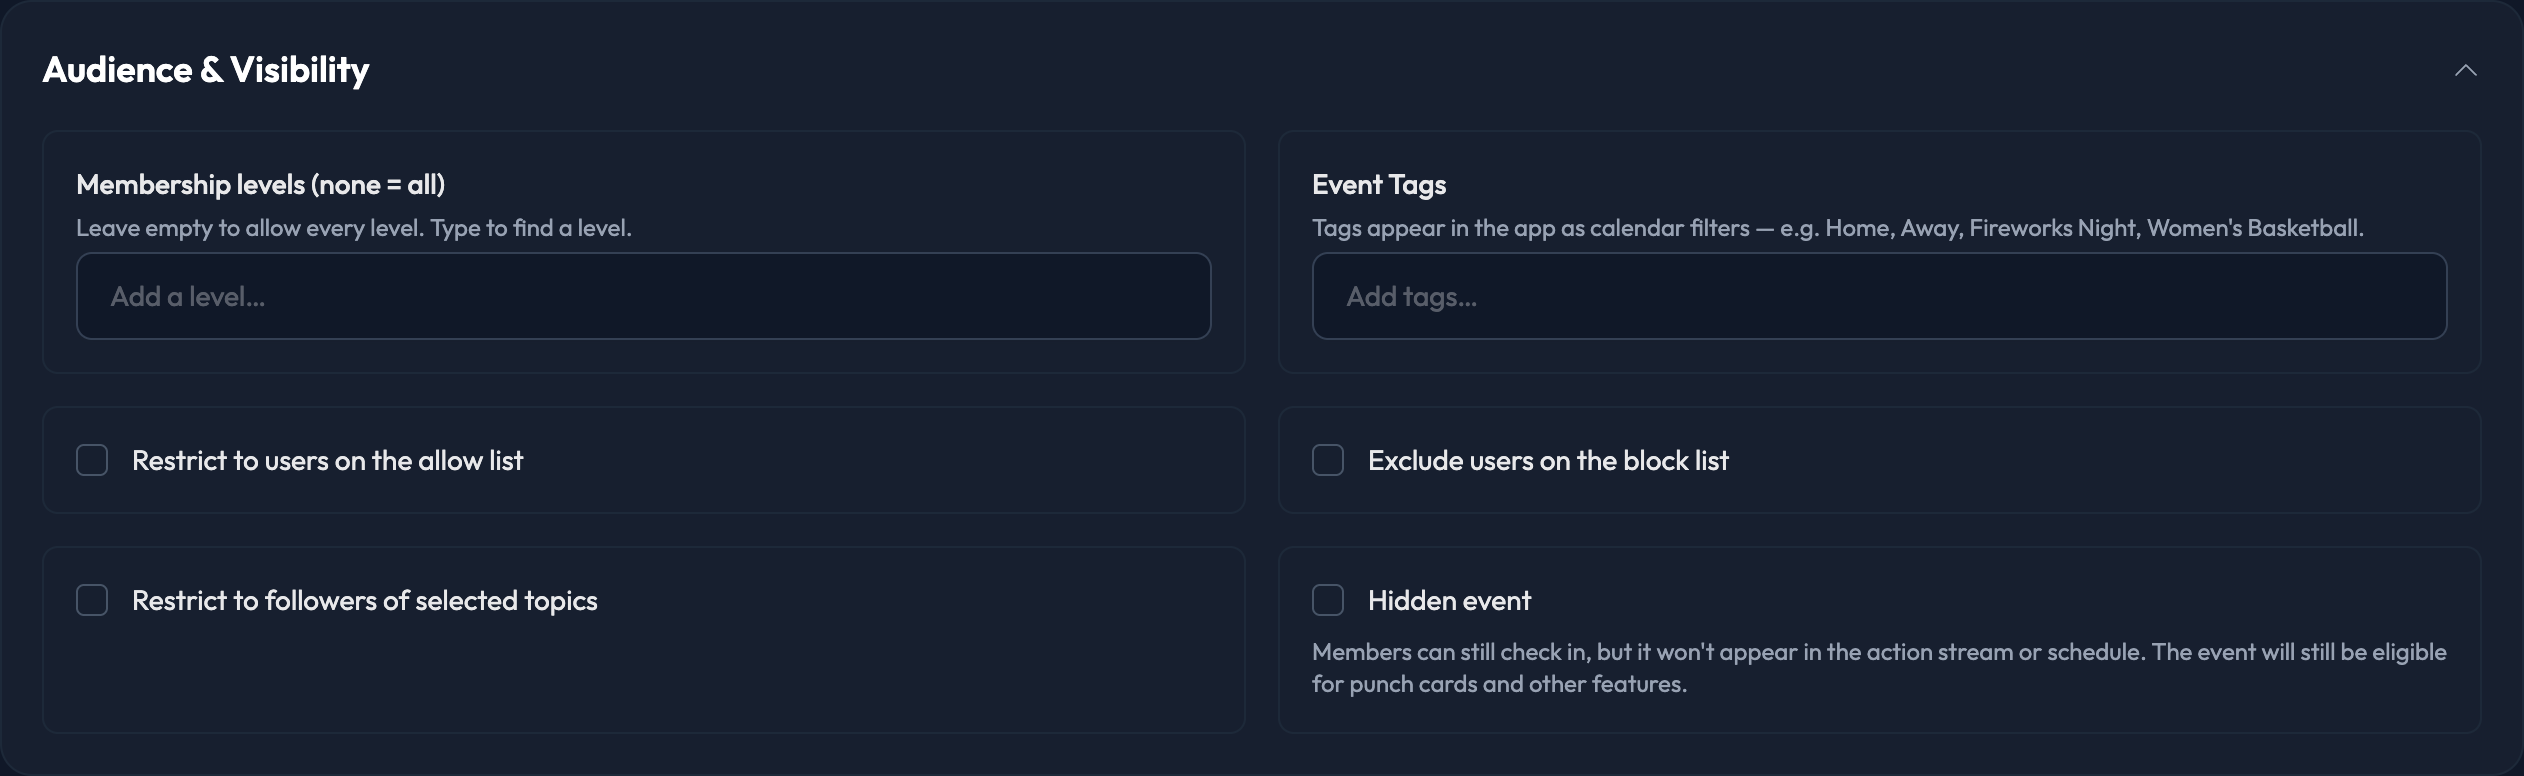
Open this section to control who sees the event and how it's filed.
Event Tags — tags appear in the app as calendar filters, e.g. Home, Away, Fireworks Night, Women's Basketball.
Hidden event — members can still check in, but the event won't appear in the action stream or schedule. It stays eligible for punch cards and other features.
Membership levels — leave empty for all levels, or pick the levels that should see it.
Restrict to users on the allow list and Exclude users on the block list — segment by member tag.
Restrict to followers of selected topics.
This is how you build check-in experiences just for season ticket members, premium tiers, or students.
If CrowdCameo is available on your program, check "Enabled" in this section's header and set Gallery Points — what a member earns for submitting a photo. The gallery is named automatically from the event.
Ticket Claiming lets fans reserve a ticket to an event directly in the app, and release it if their plans change. It is a program-level feature that Fanmaker enables for you. If you do not see this section when editing an event, contact your Fanmaker team or [email protected] to have it turned on.
To enable claiming on an event, check Enabled in this section's header, then set:
Number of Tickets — the total number of tickets available to claim for this event, counted across all fans (not per fan). Enter 0 for no limit. Once the limit is reached, fans see "All tickets have already been claimed."
Claim opens — when fans can start claiming. Leave blank to allow claiming immediately.
Claim closes — when claiming stops. Leave blank to allow claiming right up until the event ends.
Release until — the deadline for a fan to cancel (release) a claim they have already made. Leave blank to allow releasing up until the event start time.
Limiting who can claim: Ticket Claiming follows the same audience rules as the rest of the event. If you want only a specific group to claim (for example, students), restrict the event's audience using membership level, tags, or topic restrictions in the event's visibility settings. Fans outside that audience will not see or be able to claim the event.
What fans see: Eligible fans get a Claim Your Ticket button on the event, and a Release Ticket button once they have claimed. These button labels can be customized for your program, so reach out to your Fanmaker team if you would like different wording (for example, "RSVP" and "Cancel RSVP").
